|
How To Draw and Paint Drawgirl
|
 |
 |
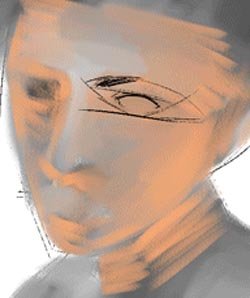
Now that the background coloring of a side of her face has been softened and the support (pastel paper) primed as a result, the reinforcement of the eye structure can be further developed and emphasized. However, as it appears in the diagram, all those lines comprising the eye are confusing. That is because a few steps have been combined since they were each so simply rendered. So, let me break them down for you. First, construct the "flattened X" as explained in step 3. "Where is the X," you ask? Answer: It is in the mind of the pastellist. Let me explain... look carefully, and you can see that half the X is there - the other half (that should be enclosing the inner portion of the distant eye) is omitted since the artist can envision that half. Since the top of the X locates the vicinity of the eyebrow and the bottom of the X locates the bottom of the eye, then, next, draw two long parallel lines to indicate the top and bottom of the eye. The bottom of the eye is already known by the placement of the X, and both the top & bottom of the eye are known by the parallelogram of step 15. That explains the two long lines. They are actually longer than what is given in the diagram, for they go around to include the other eye as well as to cut the head in half, top to bottom. Next, do likewise to limit the width (determined in step 16), but with small marks instead of long lines. By the way, the overall eye cavity (football shaped area surrounding the eyebrow/eye/temple section), was also initially defined in step 3 along with the flattened X. Finally hint at the eyebrow, itself. Hopefully, by now with this detailed explanation, all those lines comprising the eye should no longer be confusing.
Your coloring process continues still in... Step 19.
![]()
![]()
![]()
![]()
![]()
Go To Step 19
Return to Drawgirl Tutorial Home Page
Return to Home Page


